What Version of Ubuntu am I running?
What version of ubuntu am I running? I didn’t actually know how to find out without using gnome! This worked though: lsb_release -a
What version of ubuntu am I running? I didn’t actually know how to find out without using gnome! This worked though: lsb_release -a
Sometimes it’s easier to create a good Continuous Integration system from scratch than it is to improve a system which has been all bent out of shape to support bad practices or legacy issues. But if you’re going to take a wrecking ball to your CI system and start again, exactly how do you actually start? Well, in my experience, the best implementation I’ve worked on has been when the customer’s requirements were clearly understood first.
Start at the Beginning
Rather than go ahead and start by choosing your favorite CI tools and defining a standard system, start by picking up a pen and paper and go and speak with as many people involved in project delivery as you possibly can. This should include BAs, Project Managers, Testers, Developers and Systems Architects. Ask them what inputs and outputs they would expect to see and receive from the build and deploy system. Ask them what manual steps they do – you never know, your CI system might be able to help automate some of their work, even for the BAs. Quite often, Project Managers want to see quality metrics from their projects, and to get these they often rely on a manual process, perhaps expecting QA to produce bug statistics or asking a developer to produce some build reports. It seems that quite often, people are unaware of exactly what a CI system can really do for them.
Collaborative Design
Using the feedback from these sources, start to define a system on paper and continue to get feedback on your design. This needn’t be a long task, but it will help to stop you from going down the wrong path early on. Concentrate on simplicity and consistency. An over elaborate system will be hard for people to understand and then support, and ultimately that can be damaging. Don’t have several systems all doing the same thing, just have the one, reduce wasteful repetition. Don’t have 2 different types of build server in use unless you have to. Don’t support 2 types of static analysis tool that effectively measure the same thing, instead, settle on one.
In your design, be sure to include:
Design your system with the aim of making it work seamlessly, all the constituent parts should ultimately work together in an automated flow. You will find, as the system gets used, that there are likely to be several manual inputs into your system which it may be possible to automate further. For instance, I have seen an automated Hudson/Bamboo plan creation system using selenium, where users have only to input a fraction of the number of details than they would otherwise need to!
Target bottlenecks. Invest a proportionate amount of time addressing the high priority, high value parts of the system. Work out where the bottlenecks were in the old system (or the manual system you are hoping to replace) and invest the right amount of time working on those areas. There’s no point producing a system that can reliably deploy software to any OS when you only need to support one, especially if your build process is shaky and could do with more attention!
Choose your Tools Carefully
When deciding what tools to use for your system, there are a number of things to consider. The obvious ones are cost, suitability for purpose, performance and scalability. But consider other factors as well, such as how readily available the support for your tools is, check out the user communities presence and their support coverage. Also consider personal preference! If a whole team really want to use a particular tool for some reason, perhaps they’ve been excited about it for some time, then at least consider using it, you know it will get that team’s support!
Sell it!
Before you start the hard (but fun) work of implementing your system, be sure you get the buy-in you need from the management. I’m not just talking about getting approval, I literally mean buy-in. Management should feel invested in this system. Sell the system to them by highlighting the existing issues that it is going to help solve. The more the management teams buy into Continuous Integration, the more support it will get, the more it will be used, and the better we become at making software. If we fail to get management buy-in, we can easily be left with a system that is all too easily overlooked and ignored, and we can end up with a Continuous Integration System, but not actually practicing Continuous Integration.
I’ve been trying out Sonar and it looks great – it’s much more presentable than trawling through maven sites to find build reports. Anyway, I decided to install it on the live build server today, and this is how it happened:
What you’ll need:
Maven
Java JDK
Download Sonar from http://www.sonarsource.org/downloads/
Copy the zip archive over to the build server. I unzipped it in /home/maven/sonar
I’m running a linux x86 32 bit system, so to start Sonar, I cd to:
/home/maven/sonar/sonar-2.5/bin/linux-x86-32
and run:
./sonar.sh start
Sometimes it can take a few minutes for the server to start up, so be patient. Eventually you’ll find your Sonar site up and running at http://{SERVERNAME}:9000 (where {SERVERNAME} is the name of your build server where you installed Sonar. It should look a bit like this:

Next, you have to configure Maven. I’m running with the default Apache Derby database which ships with Sonar, so I added the following section to my maven settings.xml (which I found under /home/maven/maven-2.0.9/conf). You need to add this to the <profiles> section:
<profile>
<id>sonar</id>
<activation>
<activeByDefault>true</activeByDefault>
</activation>
<properties>

<sonar.jdbc.url>
jdbc:derby://localhost:1527/sonar;create=true
</sonar.jdbc.url>
<sonar.jdbc.driver>org.apache.derby.jdbc.ClientDriver</sonar.jdbc.driver>
<sonar.jdbc.username>sonar</sonar.jdbc.username>
<sonar.jdbc.password>sonar</sonar.jdbc.password>
<sonar.host.url>http://localhost:9000</sonar.host.url>

</properties>
</profile>
Then you will need to run your first project against sonar! Go to the root of one of your projects on the build server (for me they were in /home/maven/Bamboo/xml-data/build-dir/PROJ_NAME) and run:
mvn clean install sonar:sonar
Go to http://{SERVERNAME}:9000 and you should now see your project listed. Click on it and revel in sonar goodness:

I’ll migrate to a MySQL db next week, and put an update here about what to do.
UPDATE:
Using a MySql db is a doddle. Once you’ve installed the MySql you simply comment out the Derby db connection details and uncomment the MySql section in the sonar.properties file (which lives in the conf directory of your sonar installation)
sonar.jdbc.url: jdbc:mysql://localhost:3306/sonar?useUnicode=true&characterEncoding=utf8
sonar.jdbc.driverClassName: com.mysql.jdbc.Driver
sonar.jdbc.validationQuery: select 1
And that’s it!
I just installed VirtualBox on my laptop, so that I can run one or two VMs on there, and the installation and setup are really quite straightforward. The “First Steps” section in the documentation here is good enough to see you through the, er, first steps, but there are a couple of other things they really ought to put in this section, rather than later on in the documentation.
One of the first things I wanted to do was change my screen resolution, because it defaulted to 800×600 and didn’t give me any better options. So, it turns out (if you bother to read as far as chapter 4 of the online docs) that to do this you must install some “Guest Additions”… and this is how you do it:
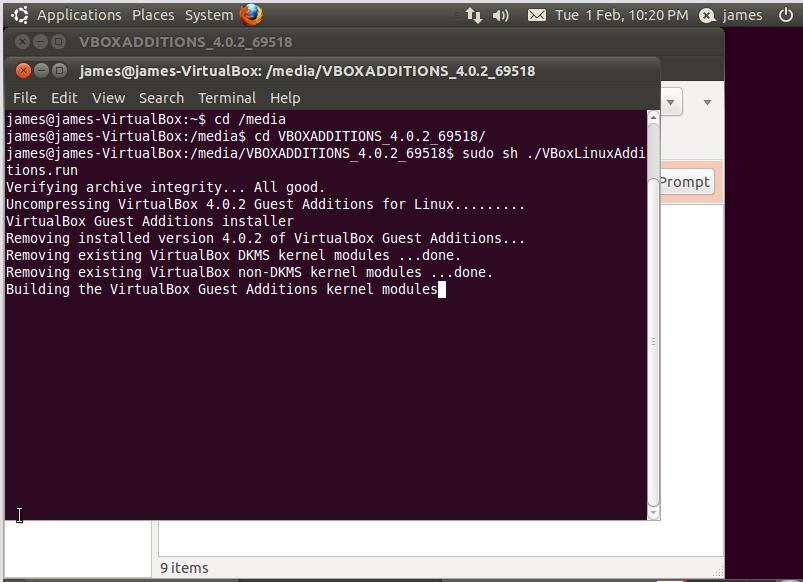
Open a terminal and cd to where your virtual CD drive appears, in my case it was in /media/VBOXADDITIONS_4.0.2_69518/ (see image below – click on image for larger pic)

Next, run the correct installer. I was running a Linux VM so I chose VBoxLinuxAdditions.run. Run this file by typing “sudo sh ./VBoxLinuxAdditions.run”, as shown below:

Once this has completed it’ll give you a message telling you to restart the guest system, as shown below:

So do as it says, shut down the VM, open VirtualBox and start up your VM again. Now we can go into System > Monitor Preferences, and you should see something like the screen below, with the new (better) screen resolution available to you:

Someone just asked me to define “best practices” for a collection of application deployments. The question was impossible to answer because the applications we were talking about were all bespoke, so each one had good and bad ways of deploying them. It would take an age to go through each one and explain which is the best way of doing their unique installation operations.
However, I’ve given it some thought and I think there are still a handful of best practices for application deployments which can pretty much extend across almost all applications, certainly all the ones we were talking about. Here are some of what I would define as best practices for application deployments.
As you can probably appreciate, this list is generally not written with installers (such as msi files) in mind, maybe I’ll look at that another time.
I’m a big fan of CI, and as a simple best practice/process for development teams I think it’s right up there as one of the most important to get right. Most software places now have a Continuous Integration system, but do they actually practice Continuous Integration? In my experience the answer isn’t always “yes”.
For me, practicing CI goes a lot further than simply having a CI system setup, and running check-in/nightly builds and running unit test/code inspections etc and so on.
So what is my definition of “Practicing Continuous Integration”? Well, for me it is simply:
I did a quick google to see if I could find a simple list of some good CI principles – I know I’ve read many of them before in numerous good books such as Paul M Duvall’s “Continuous Integration” and Jez Humble’s “Continuous Delivery”, but I couldn’t find an easy cut-out-and-use version on the internet, so I’ve decided to knock something up here 🙂
Everyone loves a good list so here’s a list of what I believe to be some principles of CI:
That’s about it for my list so far, I’m sure I’ll add to it as time goes by. Please feel free to add your suggestions!
Issue:
Maven builds running unusually slowly when using site-deploy. Dependency report taking a long time to generate. Url is invalid – repository will be blacklisted.
Cause:
By default, dependency location checking is enabled, and maven will try to connect to the dependency repository URLs for each external dependency. If it cannot connect to those URLs for whatever reason, it’ll time out – but not until after a long pause, sometimes up to 10 minutes for each URL.
Fix:
One way of speeding up these builds is to bypass the whole dependency checking process. You can do this by defining the maven-project-info-reports plugin in your pom, and setting dependencyLocatiosEnabled to false:
| <plugin>
<groupId>org.apache.maven.plugins</groupId> <artifactId>maven-project-info-reports-plugin</artifactId> <configuration> <dependencyLocationsEnabled>false</dependencyLocationsEnabled> </configuration> </plugin> |
The only drawback of this fix is that the dependency repository locations won’t be published in your maven site report.
 I’ve used this script a good few times, so I’m writing it here for safe keeping!
It’s just a simple Ant script for deleting the .svn folders from within a folder structure, simple as that. There’s an example of how to do the same thing on the Ant website, but at the moment it’s wrong (I think they’re missing a slash after the .svn).
So here’s the target:
<target name=”delete”>
<delete includeemptydirs=”true”>
<fileset dir=”C:\James.Betteley\Projects\” defaultexcludes=”false” includes=”**\*.svn\”/>
</delete>
</target>
So, yesterday I had an interesting issue with a corrupt .war file which was producing all sorts of errors when I tried to extract it, for instance:
BUILD FAILED
java.lang.RuntimeException: data starting at 0 is in unknown format
When I manually extracted the war file, or did an inspection on it (using “unzip -T”), then it gave these errors:
error: invalid compressed data to inflate
It turns out I was corrupting it by running a filter on it at an earlier stage in the build, a bit like this:
<copy todir=”${release.dir}/${app.name}/tomcat/” includeEmptyDirs=”false”>
<fileset dir=”${build.dir}/${app.name}/tomcat/”>
</fileset>
<filterset>
<filter token=”SERVERNAME” value=”${dest}” />
<filter token=”DBSERVER” value=”${db.server}” />
</filterset>
</copy>
So basically I had to make sure that the war file was copied separately, and then the other files (which i wanted to run the filter on) were copied afterwards. Interesting…
Let’s say I had a simple ant script which looked a little something like this:
<project name=”unzipstuff” default=”unzip”>
<target name=”unzip”>
<unzip src=”/home/webapps/edwinstarr.war” dest=”/home/webapps/edwin/starr/” >
</unzip>
</target>
</project>
Why oh why oh why oh why (etc and so on) would it fail with the following error?
BUILD FAILED
java.lang.RuntimeException: data starting at 0 is in unknown format
at org.apache.tools.zip.ZipEntry.setExtra(ZipEntry.java:272)
at org.apache.tools.zip.ZipFile.resolveLocalFileHeaderData(ZipFile.java:454)
at org.apache.tools.zip.ZipFile.<init>(ZipFile.java:153)
Is the .war file screwed up? If so, why does it extract ok if I do it manually? I wasted approximately 4 hours of my life on this before embarking on a convoluted and silly workaround which is leaving me feeling defeated.
